

CUBASE PRO 13 Tutorial 2-1 "Types of Tracks and Audio Track"
2024.04.18·Steinberg Cubase·10 min readMUZIUM
#cubase#daw#steinberg#tutorial#audio track#midi#music production#recording#composition#arrangement#muzium
Also available in:
English···

Go to previous lesson
We covered the basic settings for using Cubase across lessons 1-1 through 1-4. Starting from this lesson 2-1, we will gradually go through the fundamental features used in actual practice.
Types of Cubase Tracks
In lesson 1-3, we created a Ruler Track and a Marker Track. We also introduced two ways to create a Track. Let's take another look at what tracks are available by clicking the Add Track button.
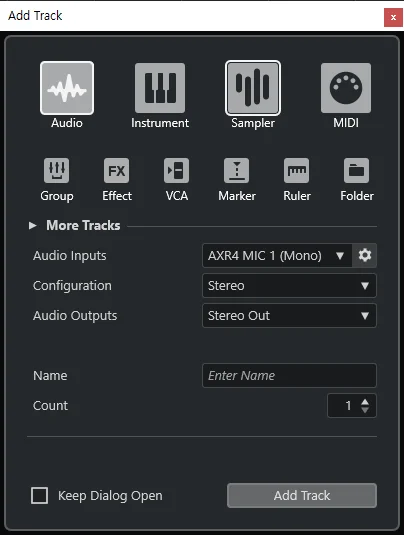
Let's start by looking at the track types listed at the top.
Audio, Instrument, Sampler, MIDI
Group, Effect, VCA, Marker, Ruler, Folder
As you can see, there are a total of 10 types. But these 10 are not all there is. Because there are so many track types, we will introduce them little by little across multiple posts.
The top 4 tracks displayed with large icons in the image are the ones used most frequently among all of them. Before we look at each one individually, let's summarize their characteristics in a table first.
Audio
Instrument
Sampler
MIDI
Audio In
O
X
X
X
Audio Out
O
O
O
X
MIDI In
X
O
O
O
MIDI Out
X
X
X
O
What this table means will become naturally clear as we examine each track in detail. To briefly explain: In refers to input (recording) and Out refers to output (playback/transmission). So Audio In indicates whether an audio source can be recorded, and MIDI In indicates whether a MIDI signal can be received and inputted. Audio Out indicates whether the inputted/recorded audio can be played back or transmitted, and MIDI Out indicates whether the input/performance signal is sent elsewhere. The entire process by which Audio and MIDI signals are passed In and Out in Cubase is called Routing.
The explanation may feel a bit difficult right now, but once you look at each track one by one, it will all make sense!
Audio Track
Inspector
In the Inspector, you can control all options applicable to that track (Volume, Pan, Routing, EQ, Inserts, Sends, etc.). While the Mixer — which we will cover later — allows you to control all options for all tracks, the Inspector deals with only the one selected track.
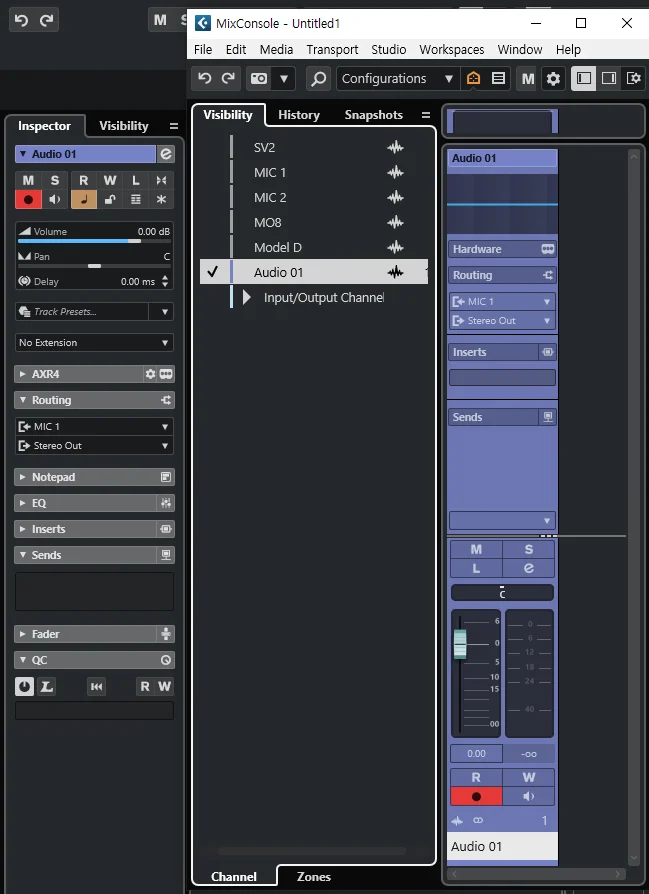
Looking at the image, you'll notice many items in common, right? Just from the text, you can confirm that Routing, Inserts, Sends, and buttons with icons such as M, S, and e are all shared. Beyond those, everything else — such as volume and panning — also moves and operates identically across all of them.
Among all these options, the very first one you should check is Routing.
Routing
The Audio Track performs the functions of Audio In and Audio Out. It is structured to receive an audio signal through Audio In and output it through Audio Out.
First, we need to understand what Audio In and Audio Out are. Let's open the Audio Connection that was explained in the previous lesson. Press F4!
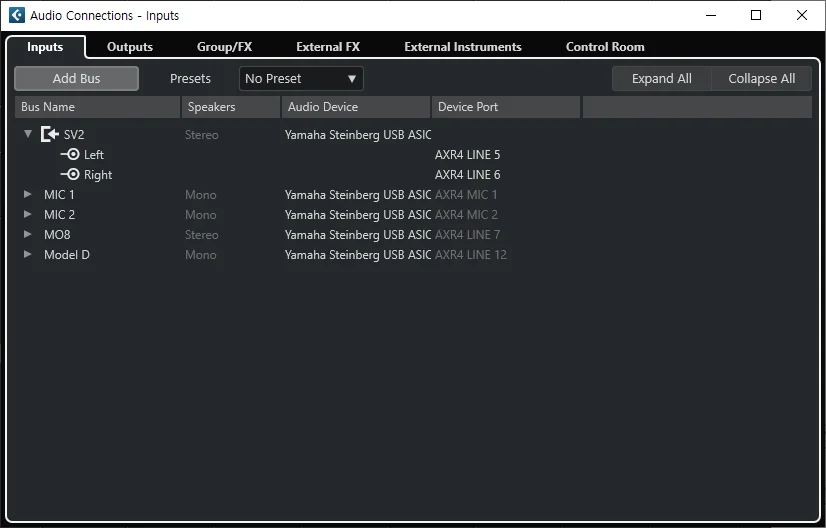
Input
In the Audio Connection window, looking at the Inputs tab, all the Audio Inputs of your audio interface should be displayed. If the Audio Device and Device Port are not assigned, set them to match the MIC, Line, or other inputs of your interface.
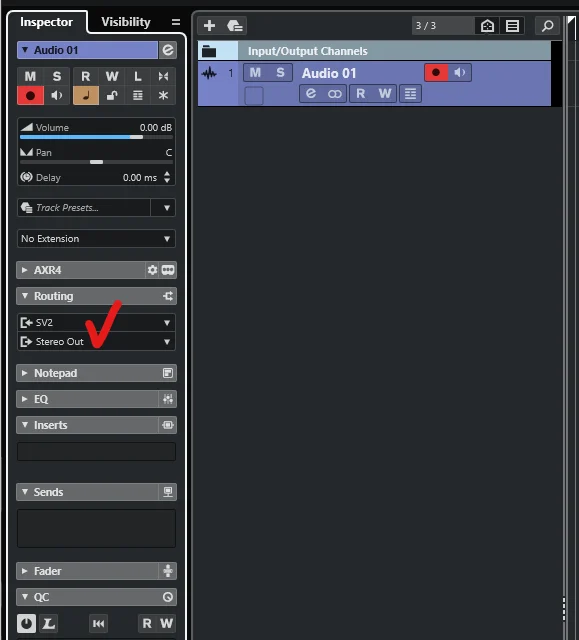
On the left, if you look at the checked section in the Inspector, you'll find an option called Routing. Here you can assign the Audio Input and Audio Output — all the options configured in Audio Connection appear here. For example, if you want to record using a microphone connected to MIC Input 1 on your audio interface, simply set the first row (Input) in the checked area to MIC 1.
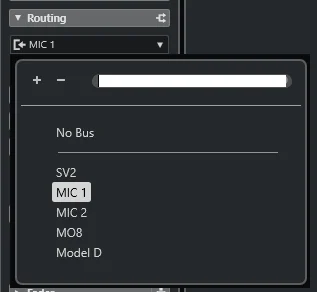
With this setting, the sound entering through the microphone will be routed to that audio track.
Output
The Output can be set in the second option under Routing. By default, it will be set to "Stereo Out," which is the main output configured by default in Audio Connection. The sound output through this will play back through your speakers or headphones.
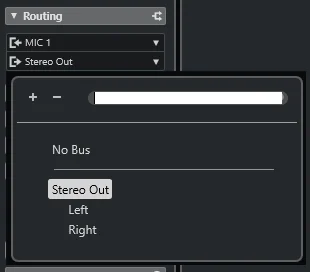
Let's look at the options available for changing the Output. You can see No Bus, Stereo Out, and options to split it into Left and Right.
Setting it to No Bus means the audio will not be output anywhere. This is typically used when you don't want to output the sound directly but need to send the signal to another track. However, this won't be used much at the basic level — we'll look at examples of how it's used in intermediate or advanced lessons.
Setting it to Left or Right will output the audio only to the left or right side of your speakers or headphones.
Track Control
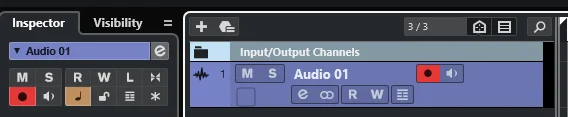
Track Control is the collective name for functions such as M, S, R, and W, as shown in the image. All options are displayed in the Inspector, and a few functions are also accessible directly on the right side of the track. Let's take a look at each function.
Listed in order from the leftmost item on the left side.
M
Mute
Mute the track
⏺
Record Enable
Arm for recording
S
Solo
Mute all other tracks
🔉
Monitor
Monitor sound entering the Input
R
Read Automation
Read automation
♩
Time Base Setting
W
Write Automation
Record automation
🔓
Lock
L
Listen
📄
Show Lanes
><
Auto Fade Settings
✴
Freeze Channel
I've written descriptions only for the frequently used functions. Mute and Solo don't need detailed explanation — they simply silence a track or play it in isolation, respectively.
Read Automation and Write Automation are options used when working with the Automation feature.
Automation
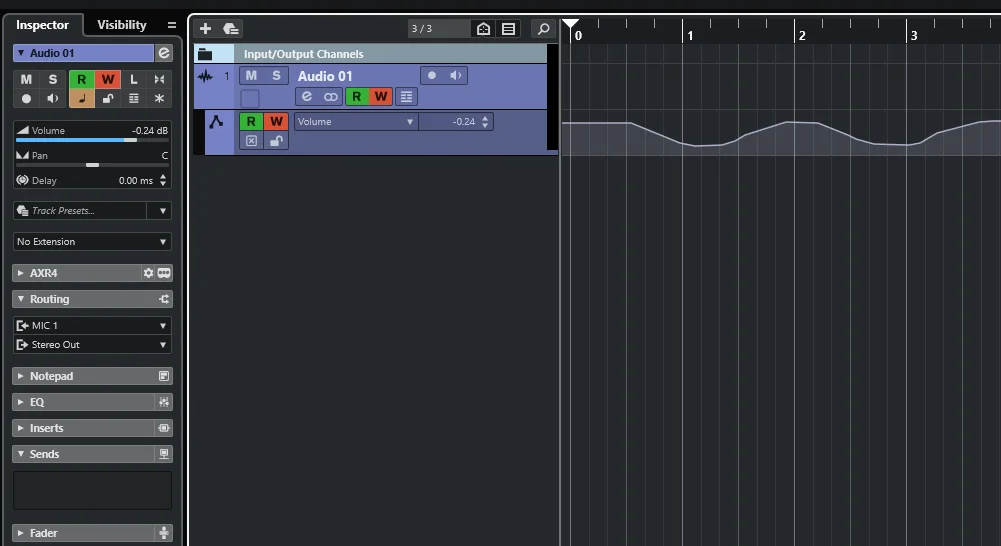
Automation refers to the concept of applying changes to control values over time. For example, you can gradually increase or decrease the volume, or adjust the panning to move a sound from left to right.
When you enable Write Automation and press play, any movement of volume, panning, or other parameters will be recorded as automation. Enabling Write Automation also activates Read Automation simultaneously.
Once you've finished recording, press Write Automation again to turn it off. This leaves only Read Automation active, and in this state the automation you recorded will be applied. Turning Read Automation off as well means the automation is ignored.
Record Enable & Monitor
Next are the Record Enable button and the Monitor button.
The Record Enable button, displayed as a ● button, is configured by default to activate automatically when you select that track. All tracks with this button enabled will receive and record the Input signal during recording. This button is present on any track that has an Input — whether it's an Audio Track, MIDI Track, Instrument Track, or otherwise.
If you want to record multiple tracks simultaneously, hold the Shift key and select multiple tracks, or manually enable the Record Enable button on each track you wish to record.
However, when you simply start recording, the sound of your singing or playing will not be output to your speakers or headphones in real time — you can only listen back after recording. For this reason, there is a feature that lets you hear the sound immediately, either while recording or even without recording.
Enabling the Monitor button, displayed as a speaker icon 🔉, allows you to hear the sound being input through a microphone or external instrument (guitar, synthesizer, etc.) directly through your speakers in real time.
One important thing to note here: if you are recording with a microphone in a room with speakers, the feedback phenomenon can cause howling to ring out loudly. It is therefore essential to mute your speakers and use headphones instead.
Show Lane
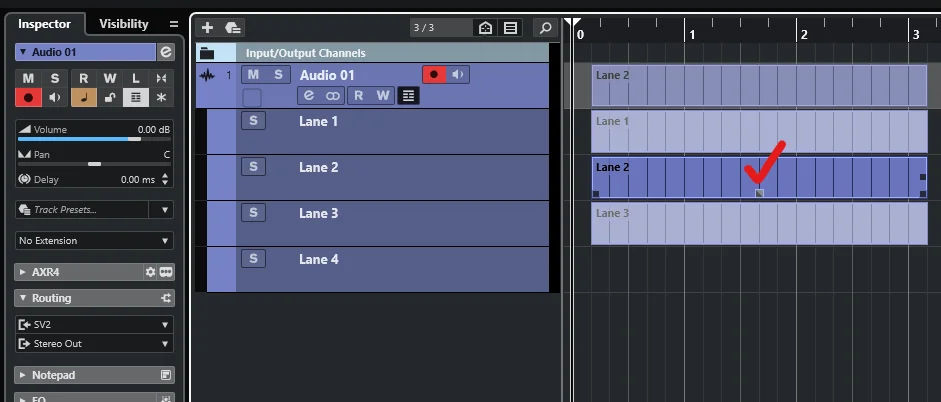
Show Lane displays the Lanes. A Lane is a place to store multiple takes within the same track — it is a feature designed to let you record the same section multiple times and then choose the best take to use.
When you hover your mouse over the Region of a Lane you want to use, small squares will appear at various points as shown in the image. Clicking the small square at the bottom center will select that take's Region for use.
Mixer Control
Volume, Pan, Delay
In the Inspector, after the Track Control section, you'll find the Mixer Control section. (This is not an official name — it's a label I've chosen for convenience.)
As mentioned earlier, this section contains the same functions found in the Mixer that appears when you press F3. You can primarily adjust Volume, Pan, Delay, and more.
There are two main ways to operate these controls.
The first is to directly drag or scroll with your mouse.
You can adjust values by dragging the fader left or right, or by dragging the numerical value up or down. You can also hover your mouse over it and use the scroll wheel to adjust.
Holding Shift while dragging allows for finer adjustments, and holding Control while clicking resets the value to its default. For Volume, this means '0.00 dB'; for Pan, it means 'C (center)'. Delay controls how early or late a track plays back relative to the others, and it is adjusted in the same way.
The second method is to double-click the numerical value and type in a value directly.
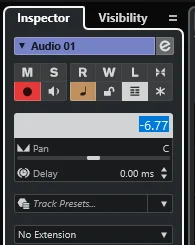
Here's a tip: get into the habit of pressing Ctrl + A before typing a value after double-clicking the numerical field — this will let you enter your desired value more quickly. For example, if you want to reduce the volume by exactly 2 dB, you can do it swiftly with the steps: double-click → Ctrl + A → type '-2'.
Notepad
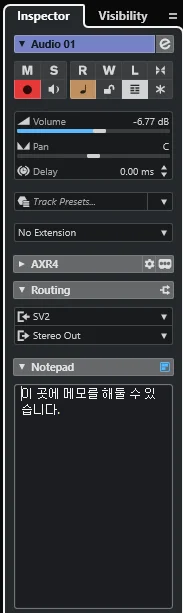
In the Notepad, you can enter any notes or memos you wish to keep.
EQ
Every track in Cubase that can output an Audio signal (i.e., every track where an Audio Out Routing can be set — such as Audio Track, Instrument Track, Sampler Track, etc.) has a built-in 4-band Parametric Equalizer. You can make simple adjustments in the Inspector, or click the checked area to operate it more comfortably with a visual interface.
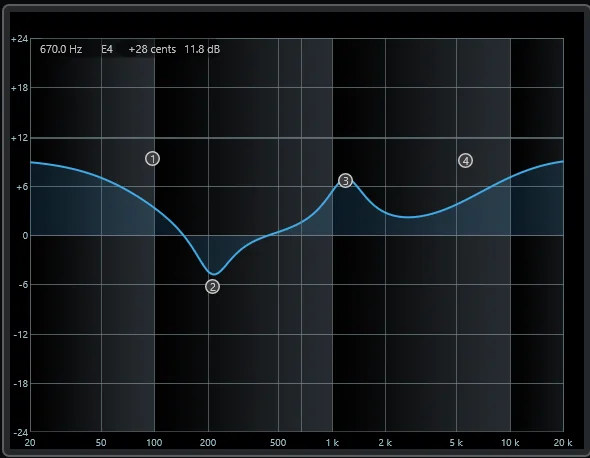
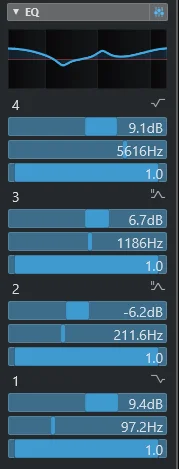
Any adjustments made in either location are synchronized with each other.
Inserts & Sends
Inserts and Sends are different concepts, but they share the common characteristic that both are generally used to utilize effect plugins. We will explain them in more detail in another lesson, but briefly: Inserts apply a plugin directly to the track itself, while Sends work by applying a plugin to the Inserts of an FX Track and then routing the Audio Track's signal to that FX Track.
To make a simpler comparison at this stage, you can think of it as choosing whether to apply an effect in a serial or parallel fashion. With the former, only the effected sound will be output; with the latter, both the dry (unaffected) sound and the wet (effected) sound can be used together.
Fader
The Fader section brings in the Mixer Control part from the Mixer. There's not much more to explain here, right?
Quick Control
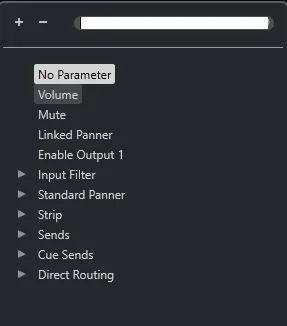
Quick Control is not a heavily used feature, but by assigning frequently controlled values to it, it can help speed up your workflow depending on your situation. Setting up to 8 QC values with the items you want makes it especially convenient to use during live performances.
Editing the Inspector
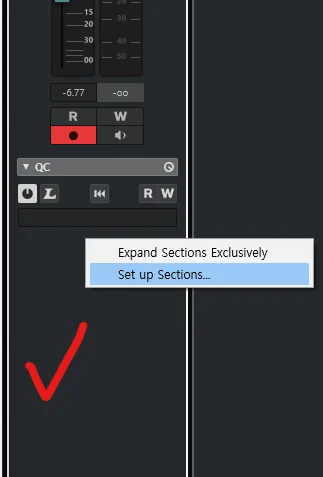
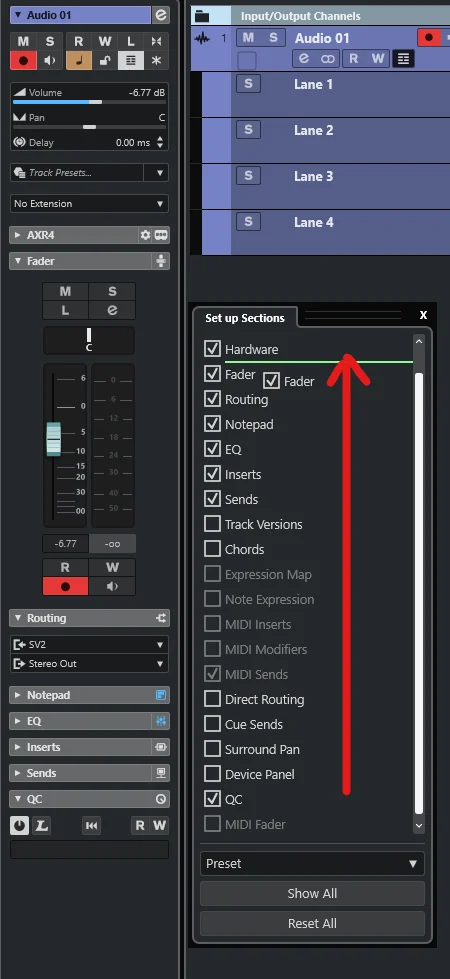
Right-clicking on the empty area below the Inspector and selecting Set Up Sections allows you to configure which features are shown or hidden in the Inspector. You can also drag features up or down, as shown in the second image, to reorder them. Features that are not used frequently have been hidden in this lesson and were not described. If needed, they will be mentioned again in future intermediate and advanced lessons.
Thank you 😀