

A Game Sound Director's Day: The Complete Guide to Voice Directing, from Script to Final Assets
2026.02.21·Study·15 min readMUZIUM
#game sound director#voice directing#audio production#game dubbing#recording direction#sound production#voice actor recording#game audio
Also available in:
English···

Not Sure Where or How to Start with Game Voice Work?
Are you standing in front of the recording booth, just repeating "Give it a bit more power"? Many people hold the script in their hands but can't quite picture the full journey of how it becomes an audio asset inside a game engine.
Voice directing is not simply about giving instructions to voice actors in a recording studio. From the moment the script arrives to the moment the final files are delivered to the game team, a sound director must make dozens of decisions in succession. Each of those decisions determines the quality that ultimately reaches the player's ears.
By reading this article to the end, you'll follow a game sound director's day in chronological order — and walk away with a workflow you can apply directly in the field, covering everything from pre-production checklists and on-set directing techniques to post-production pipelines and how to handle unexpected variables.
The Day Begins with Script Analysis: The Pre-Production Checklist
The quality of game voice recording isn't determined solely by studio equipment or a voice actor's skill. How thoroughly the director has prepared before the session begins on recording day sets the ceiling for the entire project's quality. The more experienced a sound director, the more they invest the evening before or the morning of a session into pre-production.
Script Markup: Adding Emotional Cues and Contextual Annotations
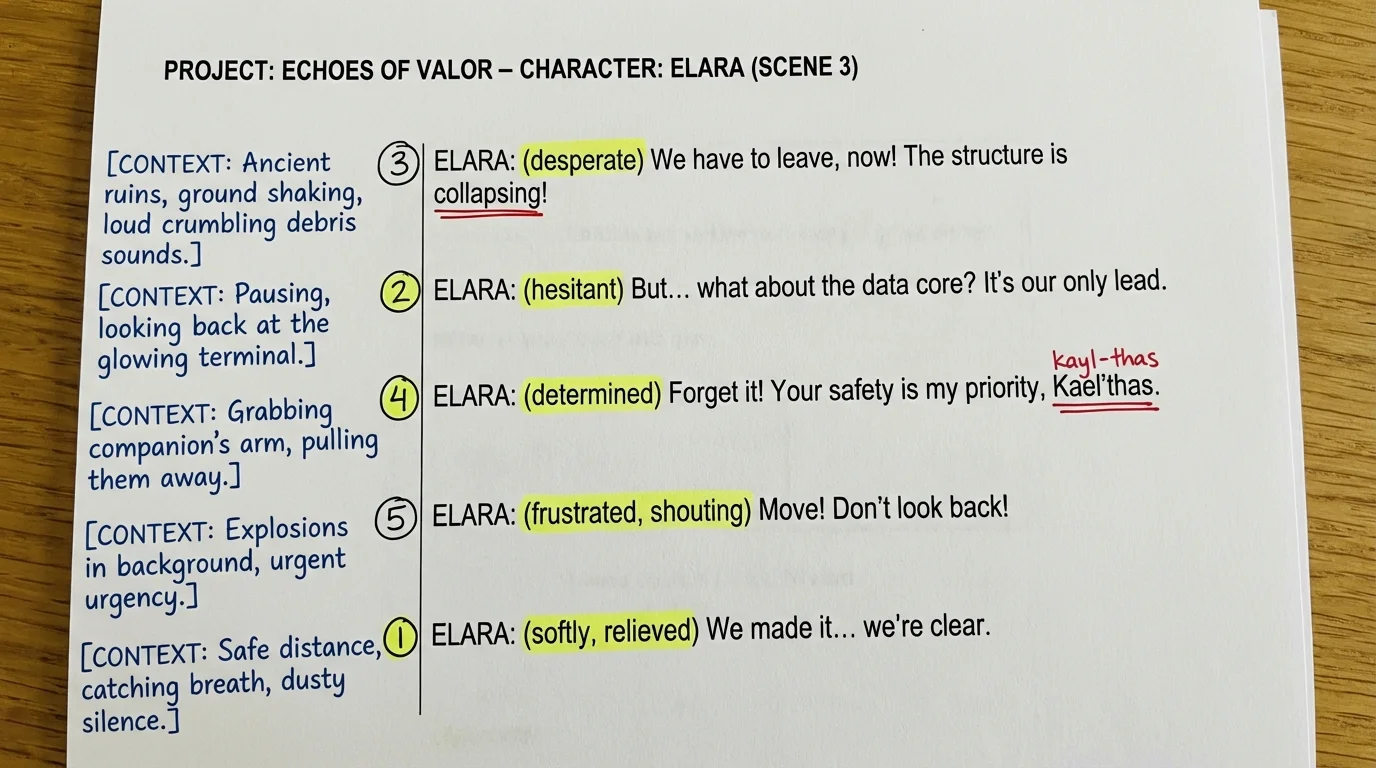
When a script arrives, the first thing to do is not read it — but analyze it. Read through the script from beginning to end and add three pieces of information to each line.
First, the Emotional Cue. Specify what emotional state the character is in when delivering the line. For example, even a line like "The enemy has appeared!" requires a completely different performance depending on whether the character is in a state of alert, on the verge of panic, or in the heightened excitement just before combat.
Second, in-game contextual notes. Write a single sentence describing what game situation triggers this line and what action the player is performing. Voice actors often don't know the full narrative of the game the way the director does, so this contextual information determines the direction of the performance on set.
Third, pronunciation guides. For any line containing proper nouns, compound words, or English abbreviations, always add phonetic notation or a phonetic spelling. If you go into recording without preparing for unfamiliar names — like "Speak to NPC Vessel Kairon" — you can easily rack up ten or more takes on a single line.
💡 Pro Tip: Adding an emotional temperature scale (1–5) to your script markup will dramatically speed up on-set communication. 1 means "calm, minimal emotion" and 5 means "extreme emotion, peak intensity." Telling a voice actor "This line is an emotional temperature 4" gives them a clear reference point, far more useful than the vague instruction "give it a bit more," and reduces the number of re-takes. Adding just one number to the sheet can shave meaningful time off your session.
Character Sheet Preparation: Voice References and Boundary Definitions
Once the script markup is complete, prepare a voice directing sheet for each character. This sheet must be finished before the voice actor arrives.
The sheet contains four items. Voice Reference: Identify one or two characters from films, games, or animation that best capture the tone of this character. Emotional Range: Specify the minimum and maximum emotional expression this character can convey. For a cold villain, write something specific like "Even anger is expressed in a restrained manner." Vocal Characteristics: Describe speaking pace, how line endings are handled, whether audible breathing is used, and so on. And finally, Prohibited Expressions: Specify acting styles that are absolutely wrong for this character. The more specific, the better — for example, "No rising line endings that give a comedic tone."
This sheet is not a document only the director sees. Sharing it with the voice actor in advance gives them time to internalize the character before the session. In practice, it is widely recognized in the industry that voice actors who receive the sheet ahead of time tend to have a higher first-take pass rate than those who receive character information for the first time on the day of the session.
Session Scheduling: Time Allocation Based on Line Count
The number of lines a single voice actor can handle in a day varies by conditions, but a commonly cited realistic pace is approximately 100 lines per hour for standard dialogue. For battle cries, shouts, and lines with extreme emotional demands, this should be reduced to around 80 lines per hour to protect the voice.
A common mistake when building the schedule is leaving no buffer time at all. If you divide the line count by hours and pack the schedule tightly, a single unexpected script revision or technical issue can cause the entire timeline to collapse like dominoes. Experienced directors leave 15 to 20 percent of the total session time as buffer. If that time isn't used for recording, it becomes space to absorb spontaneous revisions or additional takes.
Directing Techniques for Drawing Out a Voice Actor's Performance in the Studio
Once preparation is done, the real work on set begins. Many aspiring sound directors believe that "recording direction is something you learn on the job," but the core techniques can be clearly articulated. Knowing them before you walk into a session — versus not knowing them — is a difference you'll feel within a single session.
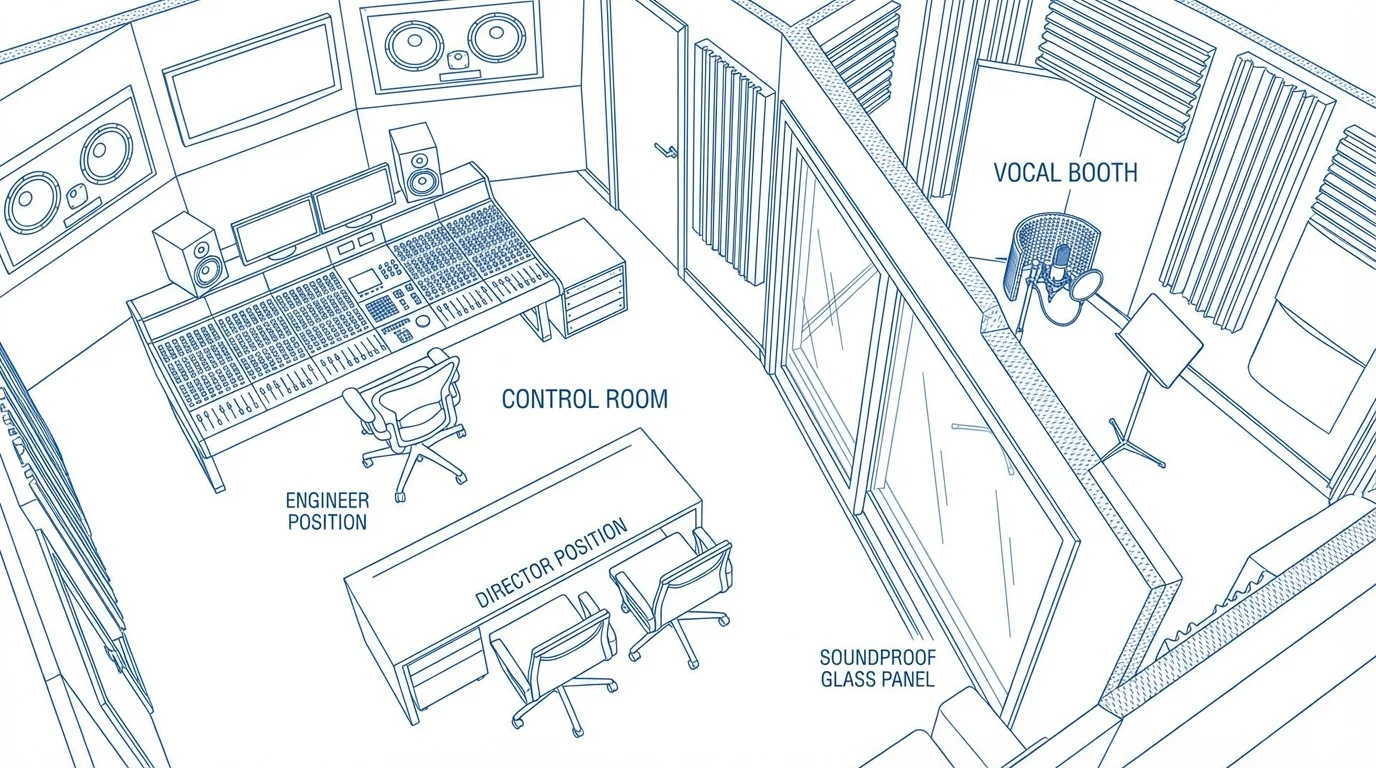
Novice Director vs. Seasoned Director: The Language of Direction Is Different
The most common instruction a director gives on a recording set is "Let's do that one more time." The problem lies in what comes before it.
Here are the kinds of instructions novice directors frequently give: "Give it a bit more power." "Put more emotion into it." "Make it feel more natural." These instructions have a direction, but no reference point. From the voice actor's perspective, their idea of "more powerful" may differ entirely from what the director had in mind, and "more natural" is something every person defines differently.
A seasoned director in the same situation might say: "Right now, this character just watched their comrade go down in battle, right beside them. They want to help, but their body won't move. Deliver this line from that place." They give a situation, not an instruction. Voice actors are performers. The most effective input for a performer is not a "command for a result" but a "provision of a situation."
The difference becomes clear when you compare them directly.
Novice Director's Direction | Seasoned Director's Direction |
|---|---|
"Make it sadder" | "This line is being said to a friend you haven't seen in three years — and that friend doesn't remember who you are" |
"It needs to sound scarier" | "This character isn't angry — they're cold. They've already made their decision" |
"Be a bit more natural" | "Deliver this line like you're talking to a friend sitting next to you — not like you're in front of a camera" |
The Playback & Redirect Loop: The Technique That Creates Session Rhythm
The efficiency of a recording session is determined by the speed of the loop: take → listen → feedback → re-record. If this loop doesn't run smoothly, session time is wasted and the voice actor's focus deteriorates.
When a director listens to a take, they use both ears simultaneously. One is listening for performance quality (emotion, nuance, timing), and the other is listening for technical flaws (breath placement, pop noise, peaks). Both tracks must be assessed at the same time.
When giving feedback, it's important to develop the habit of referencing a specific moment in time. Saying "Overall great, but the ending rose at the end" pinpoints exactly where the issue was, so the voice actor doesn't repeat the same mistake on the next take. Saying "Let's do the whole thing again" wastes the voice actor's energy and leaves it unclear what went wrong.
💡 Pro Tip: When a voice actor isn't landing the desired tone after repeated direction, try the conversation switch technique for a moment. Have them step away from the microphone, then ask, "Can we talk about this character together for a minute?" This shifts the voice actor's brain from "performance mode" to "exploration mode." When you bring them back to the microphone after that brief conversation, you'll often get a different approach. Two to three minutes is all it takes to reset a stalled session.
Eliciting Emotional Performances: Imagery Guidance and Physical Warm-Ups
When a particular emotional performance keeps coming out flat, seasoned directors reach for three tools.
Imagery guidance involves asking the voice actor to visualize a specific image or memory. Something like: "Before you deliver this line, take 30 seconds and picture the place you love most." This directly touches the source of the emotion. This method is particularly effective for drawing out abstract feelings like "warmth" or "sincerity."
Presenting an immersive situational scenario means restating the character's situation in the first person. "You are this character. You've just received a withdrawal order from headquarters. But there are still civilians who haven't gotten out. This line comes from that moment." The goal is to make the voice actor personally feel the weight of the narrative.
Suggesting a physical warm-up draws on the principle that the body's state directly affects performance. A classic example is asking a voice actor to jog in place for 30 seconds before recording intense combat lines. In fact, voice actors doing light stretching or gentle movement before battle cries or shout lines is widely considered standard practice on game voice recording sets.
The Real Work Begins After Recording: The Audio Asset Production Pipeline
Just because recording is done doesn't mean the work is over. The sound director oversees the entire post-production pipeline — from raw recorded files to fully optimized assets ready for playback in the game engine. Errors that arise at this stage can go undetected all the way until just before launch, which is why having a structured processing workflow is essential.
Editing and QC: From Take Selection to Loudness Processing
Immediately after the session ends, take selection begins alongside the audio engineer. When multiple takes exist for a single line, the selection criteria goes beyond simply "which performance was best." Without clearly defined criteria, this process can take as long as the session itself.
The priority order for take selection generally follows this sequence: authenticity of the performance → presence of technical flaws → tonal consistency with other lines in-game. If the acting is perfect but the voice actor's clothing brushed the microphone partway through, that take is out. Conversely, a technically clean take that doesn't match the emotional temperature of surrounding lines is also excluded.
After editing comes the QC (Quality Control) stage. This includes breath handling (cutting or reducing overly long breath sounds), removing unwanted noise, and loudness normalization.
Loudness normalization is the process of bringing the perceived volume of audio to a specific target level. In game audio, it is common practice to use a standard range of roughly -18 LUFS to -23 LUFS. Without this step, the perceived volume can vary from character to character — or even from line to line within the same character — damaging the player's experience. In particular, if cinematic dialogue and combat voice lines play back without volume differentiation, important lines spoken during combat can get buried.
💡 Pro Tip: For projects using game middleware (software that handles audio processing between the engine and audio files) such as Wwise or FMOD, always align on three specifications with the middleware team before delivering assets: ① the target loudness value, ② file format and sample rate (44.1kHz vs. 48kHz), and ③ the metadata structure to be included in file names. Failing to agree on these three points before delivery can result in large-scale rework at the engine integration stage.
Naming Conventions and Asset Packaging: The Basics of Game Engine Integration
Half the reason game teams ask "We received the files — why won't they show up in the engine?" comes down to incorrect file naming.
Game engines — particularly Unreal Engine and Unity — can produce recognition errors when file names contain special characters, spaces, or non-Latin characters. The basic rule is straightforward: use only alphanumeric characters, underscores (_), and hyphens (-). Exclude everything else.
A common naming convention structure looks like this: [CharacterCode]_[LineType]_[IDNumber]_[LanguageCode]
For example, HERO_BT_0042_KO.wav indicates "Hero character (HERO), battle line (BT), number 42, Korean (KO) version." Agreeing on this structure with the game team from the start eliminates naming revision requests after delivery.
For file format, the WAV vs. OGG choice comes up frequently. WAV preserves lossless original quality but results in large file sizes. OGG is a lossy compression format that significantly reduces file size, making it common on mobile games or platforms with storage constraints. In general, PC and console games use WAV delivery followed by in-engine compression, while mobile games often use direct OGG delivery. That said, the final decision always depends on the client game team's technical specifications.
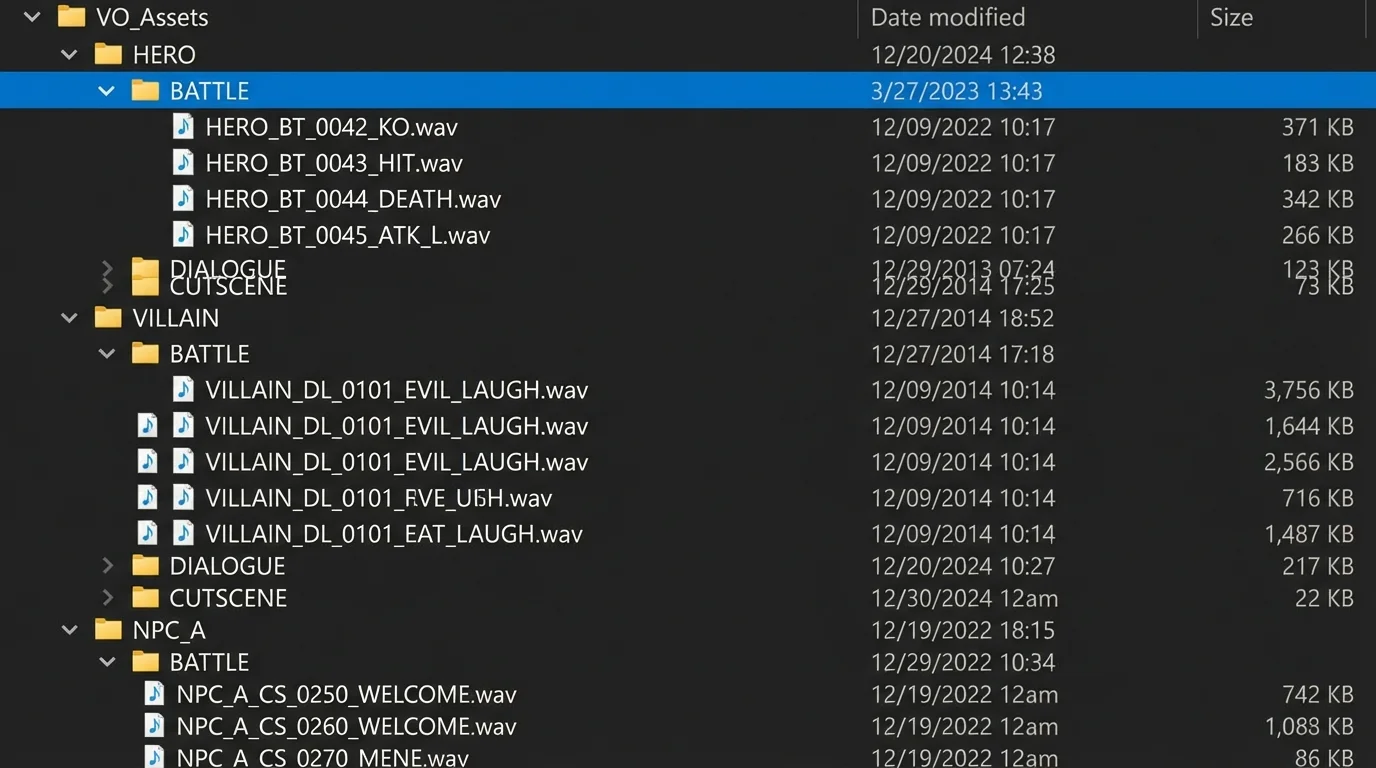
The pre-delivery checklist must include the following items: ① Confirm all files follow the agreed naming convention, ② Verify file format and sample rate consistency, ③ Confirm the loudness target value has been met, ④ Cross-reference against the script to check for missing lines, ⑤ Final check to confirm no audio clipping (distortion caused by volume exceeding maximum level) in any line.
3 On-Set Variables That Can Derail Your Workflow — and How to Handle Them
No matter how thoroughly you prepare, the real world doesn't follow the plan. The difference between a director encountering a variable for the first time and one who has faced it before isn't whether they panic — it's whether they have a response protocol ready.
Last-Minute Script Revisions: Absorbing Changes Without Stopping the Session
During game development, scripts get revised right before recording — and sometimes even during the session itself. Character names change, entire lines are added from scratch, or lines that have already been recorded are deleted.
When this happens, an inexperienced director tends to stop the session the moment they receive the revised script and attempts to review everything from scratch. This wastes both session time and budget.
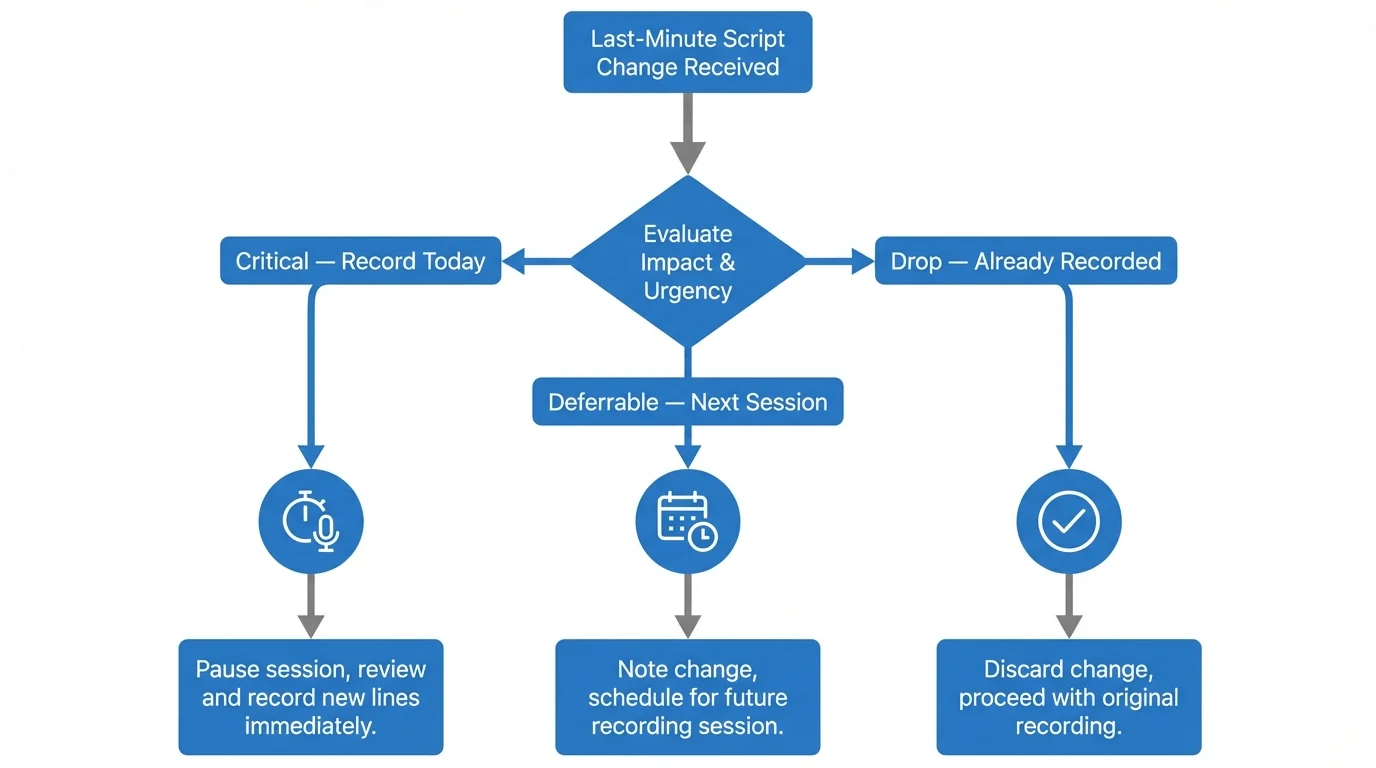
The approach to use here is triage — a term borrowed from the medical field's method of prioritizing by urgency. When revisions arrive, immediately sort them into three categories.
Critical — Address Now: Revisions that affect lines the voice actor is recording in today's session
Deferrable — Next Session: Revisions that can be handled in another voice actor's session
Drop — Already Recorded: Deletion of lines that have already been recorded and do not require re-recording
With this approach, you can absorb 90 percent of revisions without stopping the session. When the director stays steady on set, the voice actor and engineer maintain their rhythm too.
Voice Actor Condition Issues and Schedule Pressure: Setting the Standard for a Minimum Viable Take
Consider this hypothetical scenario. Two hours into the session, the voice actor's voice begins to go hoarse. There are still 120 lines remaining. What decision should the director make?
The concept needed here is the Minimum Viable Take (MVT). An MVT is the minimum level of performance that fulfills the purpose of a given line — not an ideal performance, but one that a player in the game will find convincing.
Once MVT criteria are established, prioritization becomes fast even as conditions deteriorate in the latter half of a session. High-priority cinematic lines get scheduled in the first half, when the voice actor is at peak condition. Repeating battle cries or short reactive lines are pushed to the second half. If this scheduling strategy is designed in advance during pre-production, there's no need for improvisation when a condition issue actually arises.
Let's compare a before-and-after using a hypothetical scenario to illustrate variable response strategy.
Before (no response strategy): A script revision came in mid-session. The director spent 15 minutes reviewing the revised script, halting the session entirely. The voice actor lost focus, and the first five takes after the restart all fell below standard. The session ended with only 55 of the planned 80 lines completed.
After (with a response strategy): The same revision arrived. The director completed triage in under three minutes and immediately applied only the two revisions that affected today's session. The session continued without interruption, and all 80 planned lines were completed within the scheduled time. The remaining revisions were flagged for integration before the next session.
💡 Pro Tip: When you're concerned about a voice actor's vocal condition in the second half of a session, rather than pushing through, try suggesting a 15-minute humming rest. When a voice actor gently hums at a low pitch with lips lightly closed, the muscles around the vocal cords relax. Humming is generally understood in vocal training to help the voice recover more quickly than complete silence. If 15 minutes of investment can protect the quality of the remaining 30 lines, it's time well spent.
3 Core Voice Directing Principles You Can Apply Starting Today
The quality of your script markup sets the ceiling for the entire session. On set, directing means providing context — not issuing commands — and performances come alive when you give voice actors a situation to inhabit. For the asset pipeline, naming conventions and format specifications must be agreed upon by the whole team before delivery to ensure a smooth handoff to the engine without unnecessary rework.
Pull out a page of the script from your current project. Start by simply writing a number from 1 to 5 — the emotional temperature scale — next to each line. That one small action will change the speed of communication in your next session.
Game sound directing is a discipline that requires both technical skill and an understanding of people. It's only when the precision of pre-production, the flexibility of the session floor, and the structure of post-production all work in sync that the audio reaching the player's ears is truly complete. I hope this article becomes a solid reference point for every decision you make on set. Best of luck — may your next session be full of great takes.